Creating a floorplan and keeping it up to date is harder than you think. Here is a simple solution that makes use of a Windows 365 Onedrive environment where we have a PowerPoint containing a read only viewable floor plan that links to an excel spreadsheet with the names of people sitting at the desk location.
In an office of potentially 160 people, it can be difficult to keep track of staff movements.
The following two files are filled with fictitious data, but based on a real life situation.
- https://ntschoolsau-my.sharepoint.com/personal/mark_christie_ntschools_net/Documents/Public/samplestafflist.xlsx?web=1
- https://ntschoolsau-my.sharepoint.com/personal/mark_christie_ntschools_net/Documents/Public/Sample_Floor_Plan.pptx?web=1
I have created a PowerPoint with a floor plan that I have uploaded to my business OneDrive. The floorplan has rectangles with desk numbers. Each rectangle is then linked to a cell in an Excel spreadsheet with name of the current desk occupant in that cell.
To make it easier, I have simply used column A in the Excel worksheet which I renamed to “Desk”. The person who sits at Desk Location 1 has their name entered in Cell A1. The person who sits at desk 10 has their name entered in Cell A10 and so on.
The actual filename of the spreadsheet is called “samplestafflist.xlsx”. Of course if I want staff members to view the PowerPoint or Excel file, it has to be stored in a cloud location like SharePoint or OneDrive and shared with appropriate permissions. In the case of the PowerPoint file, I share that file with read only access so people can open it and click on a desk number to see the name of the person sitting in that location.
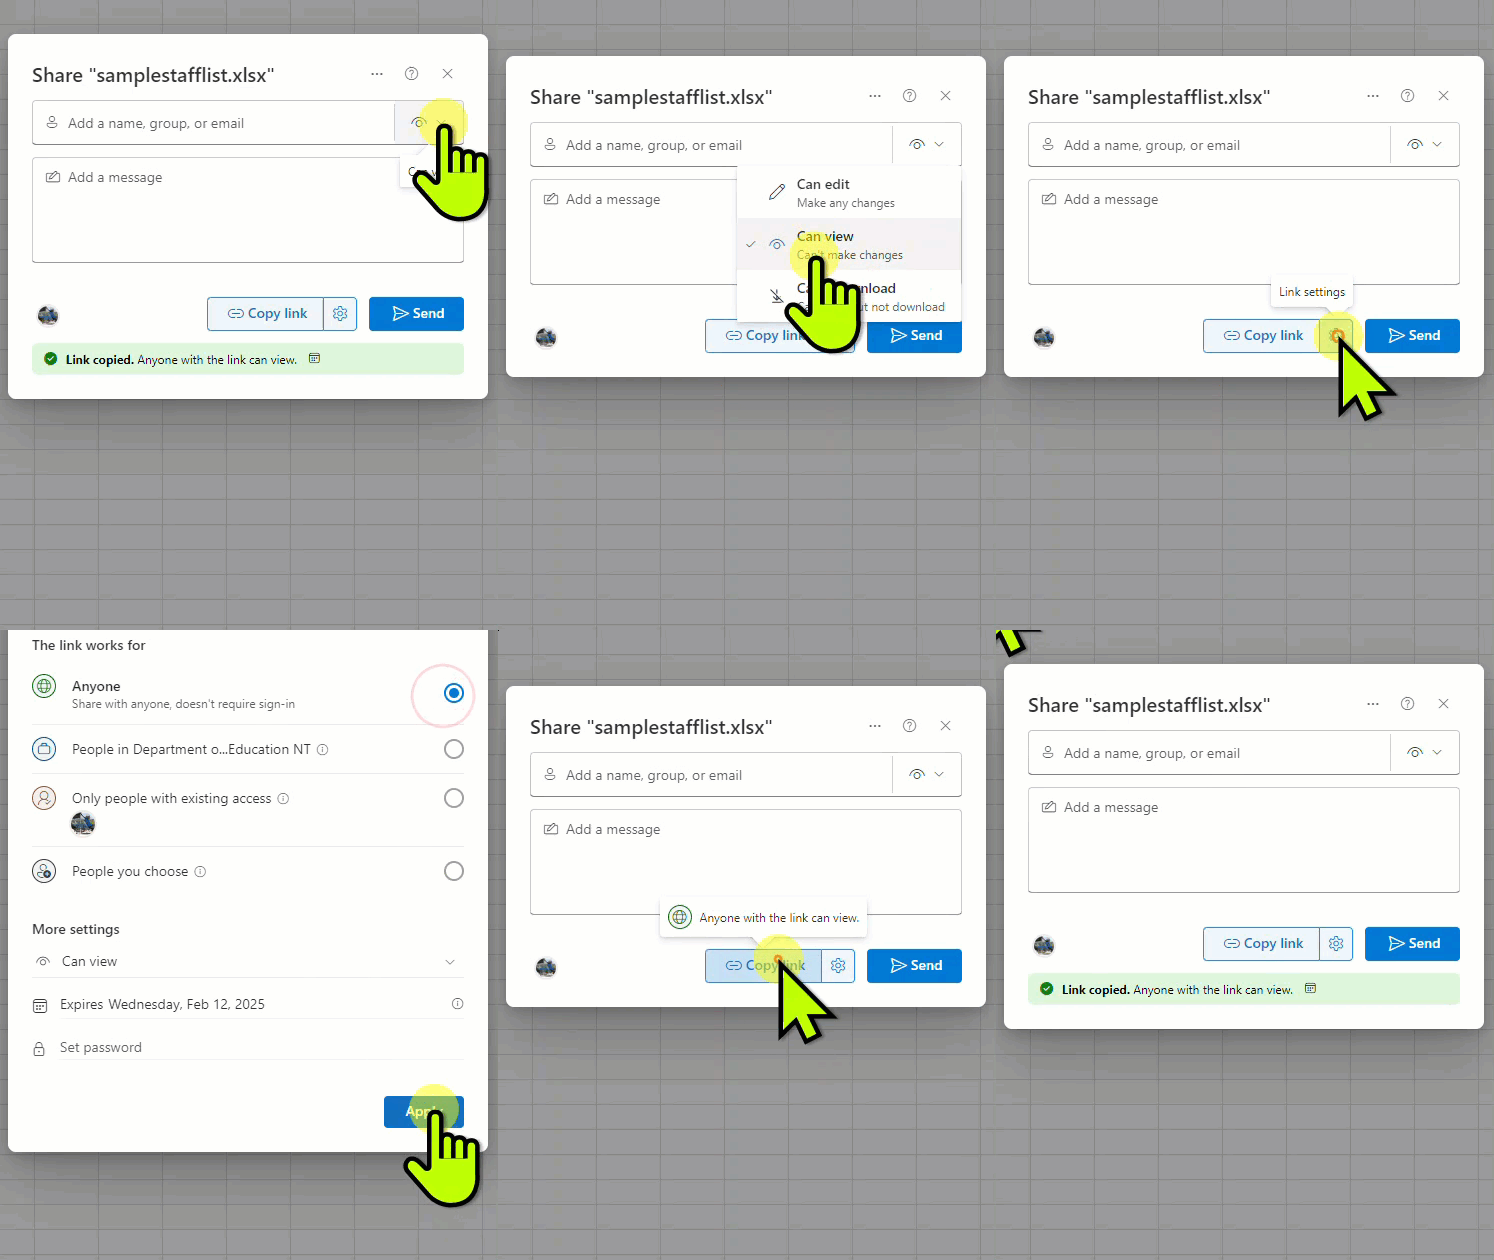
To provide a level of autonomous editing, I make the excel spreadsheet editable for a set period of a couple of days to get everyone to enter their desk location and using OneDrive I can remove the access on a particular date. I can create and share another link with just the managers to edit and make changes to the desk allocations of their team members. For this example, both the PowerPoint and Excel file are read only as they are publicly shared. Here are the read only share settings set from Windows 365.

The PowerPoint file needs the link to the cell containing the name associated with the desk position.
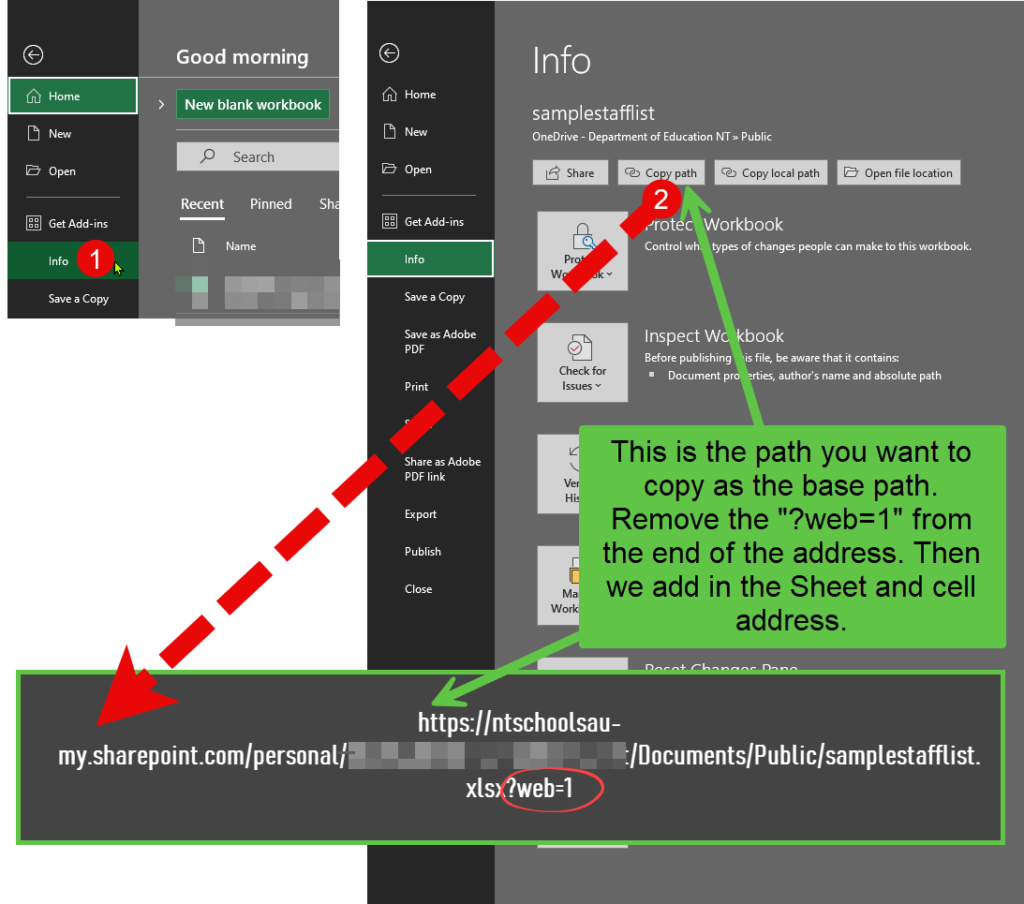
The path to the Excel spreadsheet as taken from the path above is

The “?web=1” needs to be removed from the path and then when adding a link to the PowerPoint desk location rectangle.
So for the example below, the link to show “Scarlett Bennett” is the link as follows.

What I did in real life was sent an email out to the entire floor asking them to edit the spreadsheet and add in their name against the cell location that matched their desk number. It took folks about 30 seconds to read the email and add their name to the spreadsheet. A great example of crowdsourcing data. I set the editable link to the spreadsheet to expire after 48 hours which was then placed with a read only link.
After the initial floorplan data fill, the floorplan manager can make the spreadsheet editable to team managers who in most cases are aware of staff movements within their teams. Both the PowerPoint and the Excel sheet are shared with all using a view only link. Users, by viewing the PowerPoint in presentation mode can click on a desk location and that will open the spreadsheet and jump to the cell associated with the desk number. Alternatively, people can open the Excel sheet to view the current list of names and their desk locations.
I encountered a problem with getting the hyperlinks in the PowerPoint to open up the Excel file. Despite making both files accessible (to view) by all people on our floor, and checking that the links were correct, when using the web version of PowerPoint, clicking on the link would not open the Excel spreadsheet. I had to open the PowerPoint in desktop mode (it was still stored in OneDrive) and then it would access the Excel spreadsheet and show the cell.
The PowerPoint file in this sample does not have all the links attached. Only desks 1-10 are active.

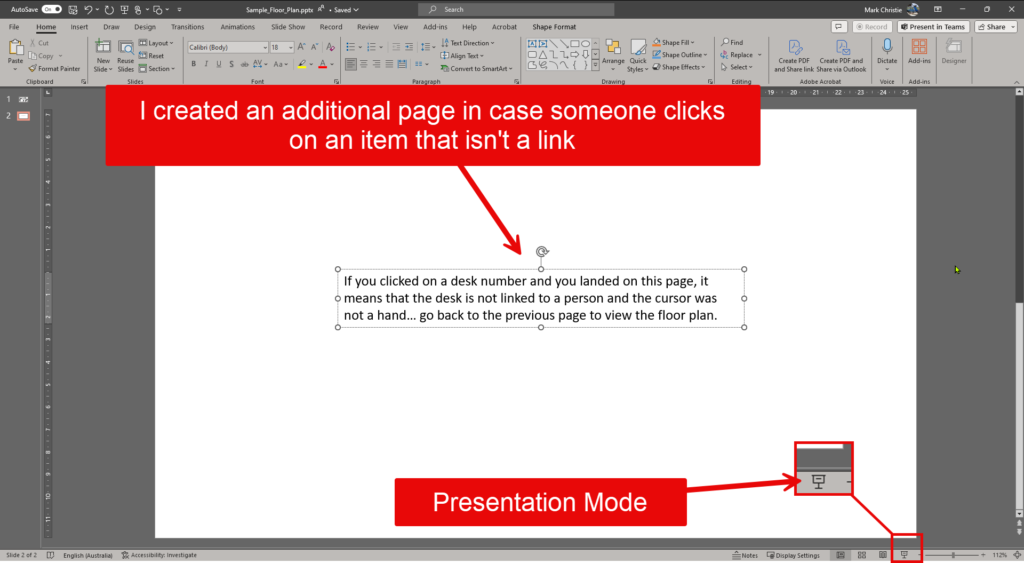
Run the PowerPoint in presentation mode and I added an additional page in case someone clicked on a desk that didn’t have a hyperlink attached.

A small price to pay for the no-code updatable solution that shows where people sit.
If the excel file changes location or name, you will need to update the links in the PowerPoint file. Problem is that links can only be changed one at a time in PowerPoint. There is a paid solution to change links, however there is an alternative solution that involves writing a small bit of VBA code to do the same thing.
With a little help from my friend Koe Pylot that only required a little adjustment, I have some code that can be pasted into the macro area of PowerPoint and quickly run to make bulk changes to objects that have links. My floorplan only has links attached to rectangles so in looping through all the items in the PowerPoint, I need to find all rectangles, check if they have a hyperlink attached to them and then if it is a hyperlink with the old address, then change it out for the new address.
Of course I don’t want to change the bit at the end that points to the cell with the name of the person attached to the desk, so I only want to change part of the address.
Before adding the code, I need to save my PowerPoint file as a macro enabled file to run the code.

Here is the code.
Sub ReplaceHyperlinkPartInRectangles()
    Dim pptPresentation As Presentation
    Dim pptSlide As Slide
    Dim pptShape As Shape
    Dim oldPart As String
    Dim newPart As String
    Dim hyperlink As hyperlink

    ' Set the old and new parts of the hyperlink
    oldPart = "ntschoolsau-my.sharepoint.com/personal/mark_christie_ntschools_net/Documents/Public/ABSHSSPOS1.xlsx"
    newPart = "ntschoolsau-my.sharepoint.com/personal/mark_christie_ntschools_net/Documents/Public/ABSHSSPOS.xlsx"

    ' Reference the active presentation
    Set pptPresentation = ActivePresentation

    ' Loop through each slide in the presentation
    For Each pptSlide In pptPresentation.Slides
        ' Loop through each shape in the slide
        For Each pptShape In pptSlide.Shapes
            ' Check if the shape is a rectangle and has a hyperlink
            If pptShape.Type = msoAutoShape And pptShape.AutoShapeType = msoShapeRectangle Then
                If pptShape.ActionSettings(ppMouseClick).Action = ppActionHyperlink Then
                    Set hyperlink = pptShape.ActionSettings(ppMouseClick).hyperlink
                    ' Replace the old part with the new part in the hyperlink address
                    If InStr(hyperlink.Address, oldPart) > 0 Then
                        hyperlink.Address = Replace(hyperlink.Address, oldPart, newPart)
                    End If
                End If
            End If
        Next pptShape
    Next pptSlide

    MsgBox "Hyperlink parts in rectangles replaced successfully!"
End Sub
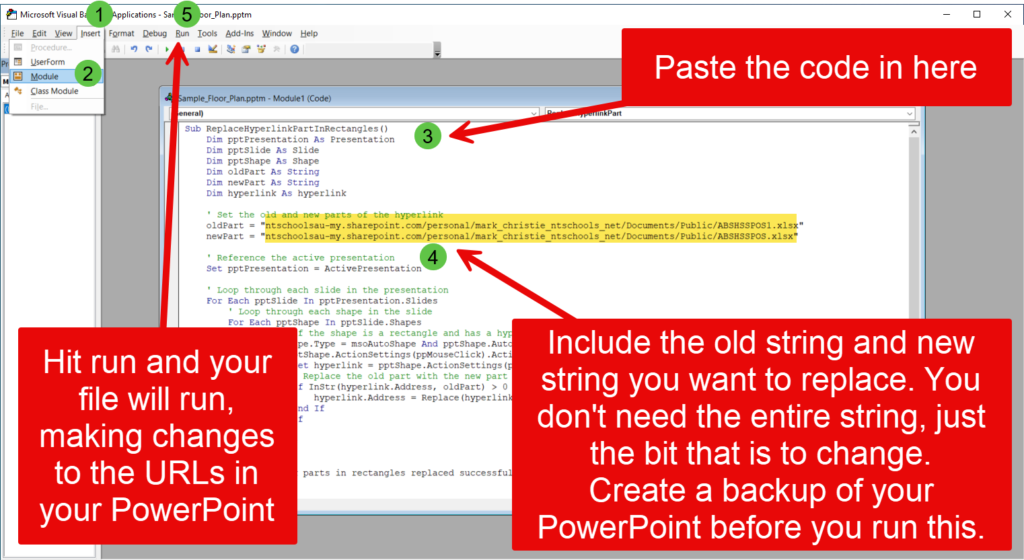
Copy the code above and with the PowerPoint file saved as a PPTM (PowerPoint Macro File) – open the file and press Alt-F11 which will invoke the Microsoft Visual Basic for Applications editor.

Here is a summary set of steps repeating some of what I have presented above.
To run the VBA code in PowerPoint, follow these steps:
- Open PowerPoint and the presentation you want to modify.
- Press
Alt + F11to open the VBA editor. - In the VBA editor, go to
Insert>Moduleto create a new module. - Copy and paste the provided VBA code into the module.
- Close the VBA editor.
- Press
Alt + F8to open the Macro dialog box. - Select
ReplaceHyperlinkPartfrom the list of macros and clickRun.
This will execute the code and replace the specified part of the hyperlink in your PowerPoint presentation.
You can test the file links by putting the PowerPoint into Presentation Mode and click on the links. If you are happy with the result, do a “Save As…” to your PowerPoint and change the file type back to pptx where you will be asked to overwrite your existing file.

