Table of Contents
Purpose
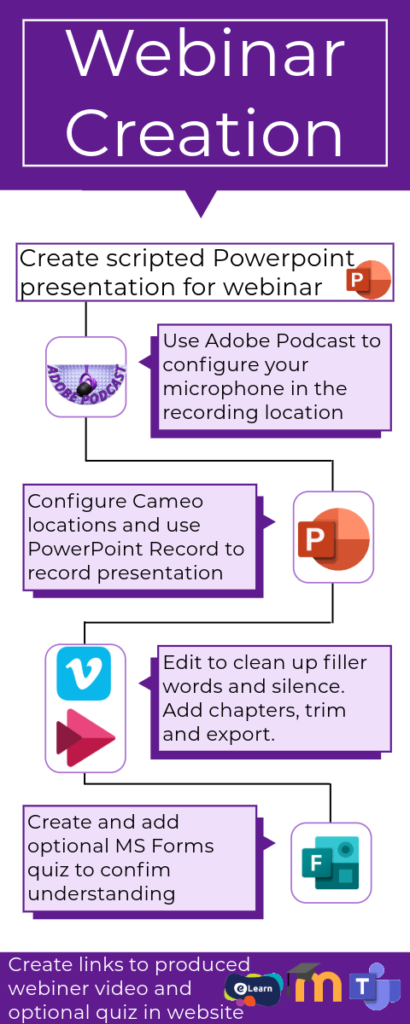
You have a presentation, a lesson, a vlog post, podcast or knowledge nugget you want to record and share with others. What tools do you have to make this easier to produce and hopefully assist you in producing a high-quality recording. For the purpose of this sample, I will assume that we are recording our webcam and voice. We will be presenting a session using a PowerPoint presentation. Once you have recorded and edited your presentation, it is shared to a streaming media platform like YouTube – although in our case we will use Vimeo although MS Stream is also a very good option. Before recording a webinar let’s look at the ingredients and then the process (which includes the skills and tasks to complete a webinar production).
Ingredients
Hardware
- Computer microphone (internal or external)
- Webcam (internal or external)
- A laptop or desktop computer
Software
We are lucky in our NT Education environment to have access to Microsoft 365 that provides the foundation tools we need.
- Microsoft 365
- Microsoft PowerPoint
- Adobe Podcast (Use your ntschools Single Sign On to access)
- Microsoft Stream
- Vimeo
- Hosting platform (MS Teams, Moodle, WordPress or similar)
Location, Content, SME, Producer and Talent
In many cases the roles to produce a webinar are performed by a single person but I want to separate them.
- SME – Subject Matter Expert creates or curates the content that forms the basis of the webinar.
- Content – This is the material to be presented. Apart from meeting the information transfer objective of the webinar, for the purpose
- Talent – This is the person or people who are presenting the content recorded by the webinar. If they don’t have experience presenting online, it is worth organising a practise with a very short deck of slides (3 slides – Topic Heading – A Content Slide – A Conclusion and call to action slide). Tips on setting this up and providing the best environment for recording are covered in the Process section.
- Producer – the person or role who coordinates the capture of the webinar recording, editing and posting to the location where it will be shared from. This guide is probably most useful to that role in the webinar creation process.
- Location – somewhere quiet or soundproof that offers an ambience that lends itself to recording. This means having an area clear of distractions or clutter. Making sure that the camera facing the talent has no backlight which is light from a window or a a light shining towards the camera over the shoulders of the talent. Make sure the location is booked with time sufficient to prepare the environment prior to the recording, do a practise, conduct the formal recording and wrap up. The editing can be carried out back at the producer’s desk. As a guide, recording time + 1 hour is a good start.
Process
There are four stages to creating a saved webinar for distribution to an online audience.
- Content creation or curation
- Content delivery and recording
- Editing and Production
- Distribution and Promotion
This is really just a step up from any live online meeting you may conduct that has a PowerPoint attached to it. You can simply record a regular session and edit the resulting video. If you do that, there are some considerations and suggestions. After the initial “camera on” introductions and greetings, you may wish to let folks know that this session will be published and to minimise distractions turn off cameras and microphones for the presentation. Questions can go into chat and it is up to the presenter on when they answer those, considering that the session is being recorded. If they are answered during the recording, the presenter should include the question. “Mark has asked…” and then proceed to answer.
Currently (Nov 2024) when you record a Teams meeting with a PowerPoint, regardless of where you place your cameo video placeholder, it will be transformed to a rectangle on the right of your recording. So there are some aesthetic downsides to recording webinars live. On the flip side, depending on what kind of audience you have and the type of presenter you are, the energy from a presentation with a live audience often translates into an energised performance on screen. Think of it as “Studio” vs “Live” or “Raw”
What approach should you choose? In an education context, if content has a “shelf life” of a semester or full year and would be watched by 60 people during that time, I would consider making the effort to record using the process detailed below.
I also want to highlight duration of your webinar. Unless you are James Cameron, I suggest you keep your webinar durations under 1 hour and ideally offer them in smaller chunks. A one-hour session on a subject would best be divided into four 15-minute videos with possibly an additional 30 second “advertisement” describing what the webinar contains.
It’s like putting a full cheesecake without a knife in front of someone compared to a cake that has already been sliced. Folks are more willing to take a piece of that cake that has been sliced for them.
Steps
The following effort applied to each of the steps depends on the longevity of the webinar (its “shelf life) and the number of people who will watch it. Longer shelf life and a large audience is directly proportionate to the effort you should put in. That said, it it is worth recording, it is worth recording well. The approach listed here in these four steps will save you time and provide you with a quality product.
- Content creation or curation
- Content delivery and recording
- Editing and Production
- Distribution and Promotion
Content creation of curation
Our assumption is that you are using PowerPoint to present your content. You want your video headshot to appear on some if not all slides so you connect with your audience. You may choose to embed a video from a source like YouTube or Vimeo or from your hard disk and play that on a slide during the presentation. You want both the sound and video to play and be captured by the recording.
Try to have a consistent location on the screen (the presentation slides where you can insert the video placeholder (Cameo) – this can be anywhere but I would start with Top Right, Middle Right Bottom Right as empty parts of your screen canvas where you can insert the video camera cameo icon. By having it in a consistent location you can add the cameo icon to all screens in one click. If you have some screens that are exceptions, apply the cameo icon to all screens and then modify the icon location for the Cameo for each of the exception slides.
Add in your script notes (before the use of the recording location) – These can be dot points or the full transcript for each slide. When you present, PowerPoint has a wonderful teleprompter tool that keeps your eyes on the screen (looking at the camera) and also looking at the content as you present.
Add any animations, object reveals and page transitions between slides to your presentation deck.
With any presentation, check the PowerPoint deck three times for three different purposes – they are:
- Content facts
- spelling and grammar
- style and look
The Ultimate and Effective Presentation Checklist (prezent.ai) You can check out some tips at this link for preparing presentations.
Content delivery and recording
Before you enter the Studio (Recording Location)
Practice reading all or some of the notes to the screen while practising page/screen presentation (you may have animations or page transitions)
Make sure that your content is finalised as per step 1.
Practice using the record feature in PowerPoint without worrying about sound quality or background noise. ie Doing a test recording at your desk.
In the Studio – Recording Location
- After you have arranged the laptop in the recording location and have it turned on with the presentation loaded in PowerPoint
- Turn off any applications that are running and that includes notifications (do the same for phones etc)
- With your microphone setup, run the adobe podcast mike check tool – https://podcast.adobe.com
After configuring your microphone for the best setting, conduct a test recording from PowerPoint using:
The three-slide practice set of slides
- PowerPoint record
- Listen to your recording
- Produce the recording as an mp4 and listen to that recording
Adjust the speed of the teleprompter to match your speaking cadence.
If you are satisfied with sound quality and the navigation / teleprompter / recording interface of Microsoft PowerPoint 365, then you are ready to record the webinar.
Some speaking tips
- After you press record and the countdown 3, 2, 1 occurs – wait one second before you start speaking
- Smile before you start speaking
- Have a glass of water out of site of the camera so you can take a drink if required.
- Look at the camera as well as the teleprompter
- You can pause recording if required to take a drink of water or gather your thoughts.
- You can re-record individual slides
Don’t
- Just start recording the webinar without a sound check
- Record the webinar without notes or a transcript (PowerPoint has a cool notes and teleprompter feature for you to use)
- Drink coffee or eat chocolate before speaking (creates a dry mouth and produces clicking sounds in the recording)
Editing and Production
Video
Once you have finished the recording, if you are reasonable happy with it, you can produce the mp4. This is done by exporting the video as an mp4 video from within PowerPoint. [demo]
If there were a couple of slides you want to re-record, you can go back to those slides and just record those slides. [demo]
Export your video as an mp4 video and download it to your desktop.
With the exported video, import it into Vimeo where we will remove any “ums and ahs” along with any extended periods of silence.
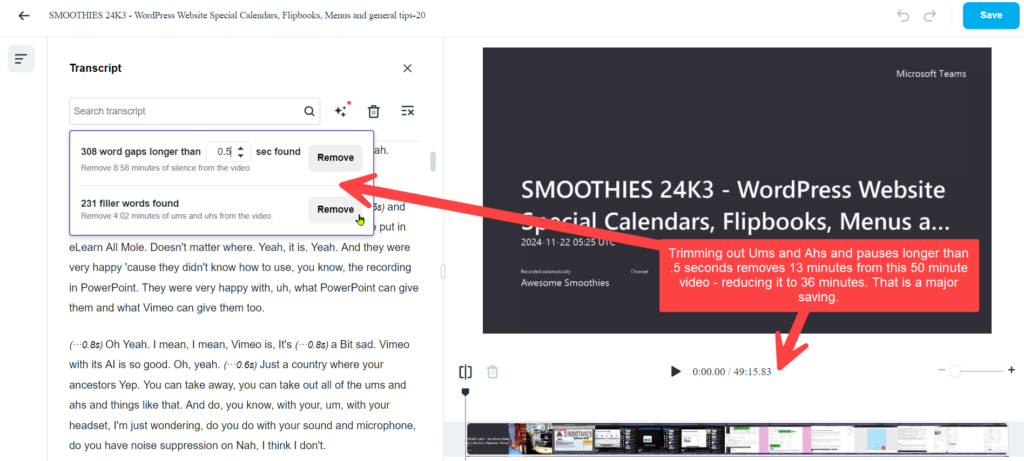
After conducting this edit and saving the video you make further use of AI to automatically:
- Create chapters
- Create a description of the video
- Create tags
Creating Quizzes
You can use a tool like Moodle (Learning Management System) to create a course that includes the video webinar recording and questions created to test or confirm the knowledge of the participant in relation to the content of the webinar.
You can create questions on the video that can serve as quiz questions for confirmation of learning by generating the questions from AI from within Vimeo. These should be compared and merged with any questions created by content SMEs.
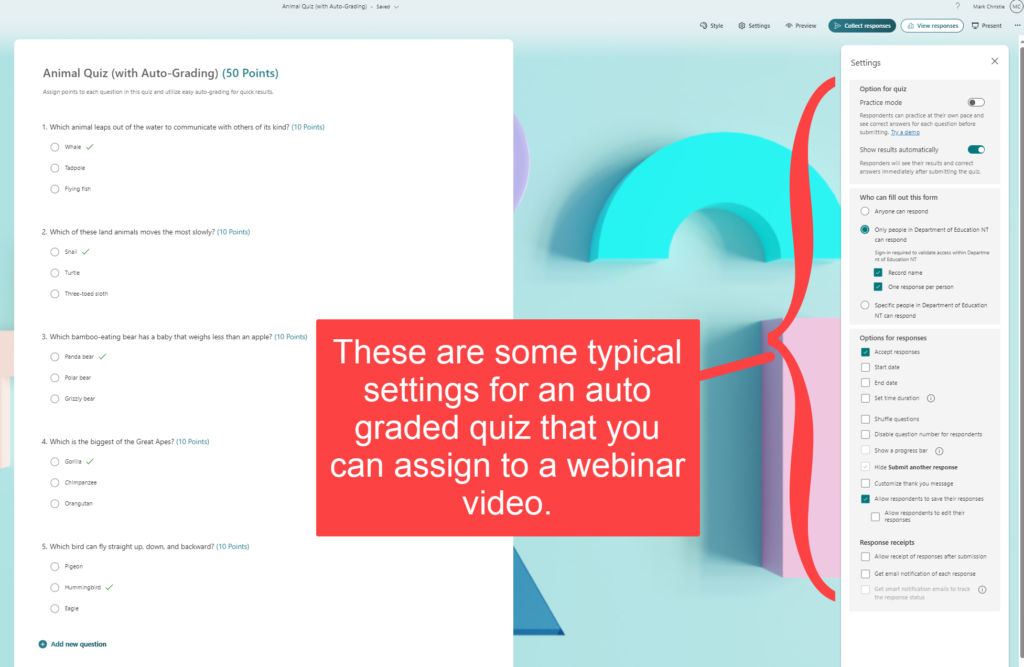
Based on delivery in a Microsoft Teams/SharePoint environment as we have in our education environment, I recommend that MS Forms are used to create the quizzes for several reasons:
- Available and free to use for all staff
- easy to use
- Linked to SSO so respondent details and data are automatically captured
- Contains required functionality for quizzing (question types, randomised presentation, scoring, branching)
- Results available as excel sheets
- MS Forms quizzes can be added as a link following the Webinar Video
- If the Webinar Video is stored within MS Stream, the same MS Forms Quiz can be embedded into the MS Stream Video
Distribution and Promotion
Example of Webinar and Quiz – Sharepoint / Teams
Webinar video hosting – MS Stream or Vimeo
Hosting of Quiz and Video sample – Adobe Express
Recommended long term solution – two choices
- Moodle course
- eLearn hosting of videos and quizzes
